Showing posts with label ideas. Show all posts

Thursday, December 15, 2011

Picky, Picky

I've got a whole list of antique furniture I'd like to bring home to the Einsel House, but I realize it will be years before I could ever find (and afford) all the pieces I want.  The highboy style dressers in our bedroom and Neil's are nice, but I daydream about replacing them with something more Empire style from the mid nineteenth century.   Like the one pictured to the left - it sells on New Year's day at the same auction house where we bought our kitchen island last year.

A couple of blanket chests sell the same day, and I can just see one setting in front of our couch, holding the blankets that for now are just stacked on the floor.


Another piece I can see in the Einsel House is a corner cupboard.  And I've got a few specific requirements for this corner cupboard.  Since it would go next to the open shelves in the dining room, I want the corner cupboard to have solid doors.  The cupboard also will need to be a bit on the small side, as there is only three feet from the corner of the room to the register along the east wall.  In about a year of searching I've only seen a few such cupboards available (and none of those close enough to be convenient).   So imagine my excitement earlier this week when I went on Craigslist and saw this:
image 0

And only about 10 miles from us!  I called the phone number listed and arranged to look at the piece after work yesterday.  Charles could tell how excited I was about the cupboard and told me if it was what I wanted to go ahead and get it. 

So a little after five last night I got home, put away my purse and told Charles I had enjoyed chatting with the cupboard's owner for about half an hour, and that he had grudgingly come down to my price.  And that I didn't buy the corner cupboard.   Of course, Charles' first words were, "Why not?".  The answer is that I'm picky.  Walking up to the cupboard I had immediately sensed something was not quite right.  It was made of pine.  And when I opened the upper door and saw the narrow beadboard interior I realized the problem.  A closer look at the hardware confirmed it - the cupboard dates from around 1920, give or take a few years.  It was the right size, the right shape, the right color, just not the right age. 

The cupboard's owner might have just been trying to make me feel better, but when I finally (and apologetically) told him I couldn't take the cupboard he said, "I understand.  I'd think twice myself before putting that cupboard in an 1840's house."   I'm well aware that I'll probably never find a true mid nineteenth century walnut or cherry corner cupboard for the price I was offered yesterday.  But I woke up this morning with no regrets at yesterday's decision.  I suspect this means I'm an antique snob.  If so I can't deny it. 

(And sorry I've been scarce around here.  I've been having fun with some writing of a slightly different sort lately.)
 

Sunday, November 20, 2011

In the Details

There's an old barn just south of here on the county line that rests quietly in a grove of trees.  


I've been known at times to take a slightly longer route than necessary just so I could enjoy the scene pictured above.  Still, I had been driving by this barn for several years before I noticed a little detail near the gable peak.


See it?

This whole summer as I was working on our little Einsel shed I've had the old barn in mind.  So earlier this summer, with camera in tow, I stopped at the old barn. Although I knew there were three stars in the old barn's gable, it was only from inside the barn that I realized the peak was a five point star while the two lower were six point stars.


And so, the south facing gable peak of the Einsel shed:


I am so thrilled with how this turned out.  There's no corresponding interior picture from the shed, though.  Behind my stars are boards painted black with several holes drilled through to provide ventilation.  Secured to the front of the black-painted boards is a layer of screen to hopefully prevent wasps from nesting inside the shed. 

I've really enjoyed my work on this side of the shed, bringing to reality the details I've seen in my mind for so long.


Obviously, I'm not quite finished yet.  The upper right corner will continue out to incorporate the new awning, and I've got two doors to build and install.  With Thanksgiving and December around the corner I figure my outside work is basically done for the year, but I'm hoping my mom won't mind if I use her (heated) shop - and perhaps advice - while building the doors.  The door hardware I ordered is on backorder right now, so I've got a little time anyway.  (Oh, and since I'm guessing some may be curious, the thick wire hanging off of the roof is from the lightning rod.  I'm thinking eventually it will be rerouted to hang over the back of the shed instead of the front.)

I'll have two sides of the shed to finish next summer, but I'm quite pleased with what I've accomplished so far. 


Not too bad considering what the poor little building looked like last May:


: )

Wednesday, January 12, 2011

The Kitchen Project Begins

I'm taking off on a new project.  But unlike earlier Einsel-projects of this scale, I'm going to be taking this project on solo.  When you live in a house like this one there are countless benefits to having a mother whose day job is in a custom woodworking shop.  But there is a downside - I've been perhaps too reliant on my mom's skill and willingness to help.  I'm grateful for the help.  So grateful.  But I'm also tired of feeling intimidated and incompetent when left alone with any power tool that involves a blade or compressed air. 

So as I contemplated the changes I have in mind for our kitchen, I also contemplated tackling this one alone.  Mom's seen my plans for the kitchen, and she knows I'll be relying on her advice (and extensive tool collection) but she also knows I want to do this myself. 

I'm starting on the north end of the kitchen.  The only change in this half of the room will be the addition of beadboard wainscoating under the existing chair rail.  Here's a picture of my progress so far:


In a way I feel like my age was just divided by ten and I'm a three year old insisting, "I can do it by myself!".  And, like a three year old, my progress is much slower and my work perhaps a bit rougher around the edges.  But I did it myself, gosh darn it!

My plan is to do the room in sections, which means I will prime and paint the beadboard pictured above before moving on.  We're living in the house, and I'm hoping to keep most of the kitchen in some semblance of order as I proceed.  Up next will be the northeast corner of the room, which will be a repeat of the beadboard work I'm doing in the northwest corner of the room.

The south half of the room will be more challenging.  Here's a picture of what I'll be starting with:


(Any guesses where Tiny the Cat's food and water dishes are?)  The plan here is to add crown moulding and new hardware to the upper cabinets.  They will be painted the same off-white color as the beadboard and trim in the other end of the room.  If the budget allows, there will also be new counters and a new sink before giving the lower cabinets the same treatment. 

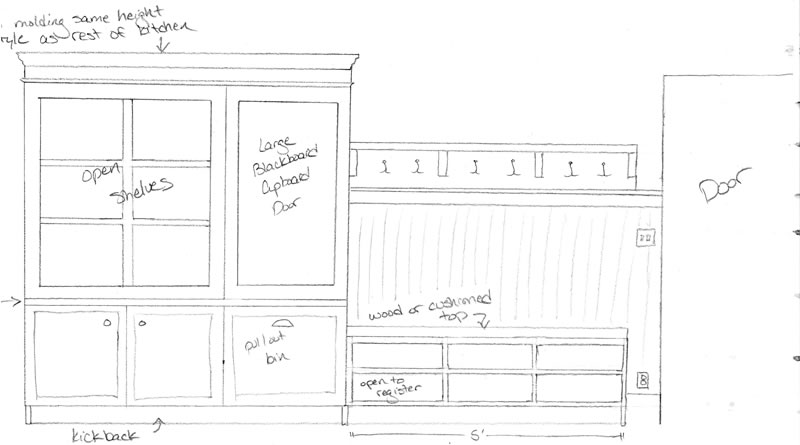
The wall along the right side of the above photo of the Einsel House kitchen is going to present the biggest challenge.  Part of this wall will be a mudroom style row of hooks with a small shelf above and a bench below.  I'll be using the picture at right as a guide, except I'm planning on open cubbies for shoe storage on the bottom rather than a closed bench.

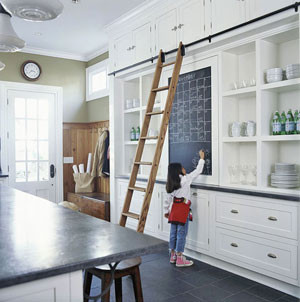
Initially this bench and hooks combo was my only plan for our southwest kitchen wall.  But while browsing at Houzz I found this picture:

Kitchen Storage Wall traditional kitchen

And I instantly knew what I wanted to do.  Merging my original bench and hooks plan with the left half of the entourage pictured above I sat down and sketched out this:


Yeah, kind of crazy I know.  Especially when I admitted just a few paragraphs back that using a brad nailer or a circular saw makes me nervous.  But I'm still planning to do it. 

Saturday, January 8, 2011

"Plans are only good intentions...

...unless they immediately degenerate into hard work."  ~Peter F. Drucker

2010 was quite a year here at the Einsel House. Here's a selection of scenes around the house from the beginning of 2010:


By December things looked a bit different:


And if we can accomplish half of the projects I have planned for 2011 then things should look different still by next December.

So, what’s in store for 2011 you ask?

The Shed
This poor little building is long overdue for a little love. The picture at left was taken in October of 2009, but it basically looks the same now.  Our plans for this spring/summer are to tear off and replace the rotten awning, recoat the metal roof, wrap the entire building in tar paper and then cover it with salvaged barn siding.

The Stone Bridge
This is perhaps the most intimidating project on the horizon, but given the rate the bridge is eroding I know we should not put this off. The plan is to rebuild the bridge in 4 sections, starting with the northern half of the west side. I suspect this may be a four year project.

The Springhouse
Although the springhouse was the focus of much attention in 2010, the work on this little building is not yet finished. I want to replace the windows and finish work on the roof, as well as plant some ivy or other ground cover around the new stone walls in front of the springhouse.

More Masonry Work
We’re saving our pennies so that we can have our masonry contractor return this spring to repoint the east side (back) of the house. The previous owner of the EH repointed the north side of the house, and our mason did the west side in the fall of 2009 and the south side in June, 2010. Once the east wall is repointed this spring/summer we will save up and hopefully be able to have the chimneys rebuilt sometime in 2012.

The Kitchen
I'm quite excited about my plans for this room and predict I’ll dive into this project sometime before January ends. More details should be coming in a post soon.
The Yard
The yard here is currently a blank if somewhat bumpy slate. My (perhaps overly ambitious) plans for this summer include clearing a small area along the creek for a stone bench that Charles’ parents gave to us last year and planting a vegetable/herb garden in front of the kitchen wing and surrounding it with a picket fence. And of course more general leveling and stump clearing.

So here’s to twenty-eleven. Do I think all of the projects outlined above will be completed a year from now? Probably not. But we’ll have fun trying!

Monday, December 20, 2010

You're Gonna Wind Up Where You Started From

I’ve been pondering the east wall in our living room. This is the wall where we took out a closet added by the previous owners. (See the second half of this post from Nov. 2009.)  This is also the wall that originally had a window facing out on the former side porch. That window was closed in by the previous owners when they enclosed the porch to expand the bathroom. But we still have most (all?) of the walnut trim from the original window.  If you go back and read that post from Nov. 2009  notice that at the end I wrote we were "still trying to figure out what to do about baseboard".

Well, this is what the wall currently looks like:


Um, yeah, we're still trying to figure out what to do about baseboard.  Putting baseboard up sounds easy enough, but in reality it’s posing something of a problem. The pictures below are recycled from a post last April.  They show a before and an almost after of some baseboard on the south wall of the living room:


Notice that the paneled area under the window takes the place of the baseboard. Although we saved all of the baseboard we removed from the east wall, because that wall originally had a window (with a full paneled bottom) there is not enough of the original baseboard to now cover the entire length of the wall. Thus the problem.

Despite having access to two woodworking shops, it appears that successfully recreating the profile of the molding at the top of the current baseboard is going to be something of a challenge. And there’s also the problem of what wood to use for the new baseboard. I’m semi-confident that we can match the color of the EH’s existing wood but matching the old lumber's grain is a bit more difficult.

If we put back up the original baseboard I’m worried we will wind up with a piecemeal effect – two short sections of the original walnut and a third newer section (that, for the reasons explained above, I fear would stick out like curly fretwork in a Frank Lloyd Wright house). The other option is to recreate the entire length of baseboard in one piece of new wood – but we would still have to find a way to match the existing baseboard's color, grain and profile before I would be willing to do this.

Now, even though actual work on the house has basically been at a standstill for the last few months, the planning and plotting in my head never stops. And so, after six months of living with a baseboardless wall, I’ve come up with two other options for dealing with this dilemma.

The first possibility occurred to me a couple of months ago when I noticed the picture at right while flipping through This Old House magazine.

Hmmmm…Our wall had a window in it originally. And like I mentioned before, we still have most (all?) of the original trim from that window. What if we put back up the original window trim, bottom panel and all, and simply replace the actual ‘window’ part with a mirror? If we did, then the remaining original pieces of baseboard should be enough to complete the wall. Hmmmmm…….

After pondering this idea for a few months I’m still not sure if I like it or not. I do like the fact that it would put more of the beautiful original walnut back into the room. And it would create a focal point. But I worry that as a focal point it would draw attention to a feature that has obviously been altered from its original appearance. After all, even if we put the trim back up we can not recreate the depth of the original window. And would a single, solid mirror look misplaced next to three other 12-paned windows?

Then while browsing the houseblogs site I noticed this "Faux Fireplace" entry at Petworth Row House. And I thought, "Hmmmmm…..". Using the existing trim pieces from the former window, I suspect that we could make a mantel that would blend perfectly with the rest of the room. Couple that with an electric fireplace insert and we could really dress up that east wall. And with a fireplace eating up a good chunk of the wall space, the original remaining baseboard would be enough to finish the job. I’ve always felt that a fireplace is the one feature that seems to be ‘missing’ from the Einsel House. (And based on how often visitors ask, "So where is the fireplace?" it’s obvious that I’m not alone in my feelings on this matter.)

But, but, but…an electric fireplace insert?!?! Am I in my right mind? In the kitchen I wouldn’t think twice, that room has already been altered way beyond its original condition. But the living room still exudes vintage 1840’s charm. We might be able to create a mantel that would not spoil that authentic feel, but what about the rest of the fireplace? 

I admit, at first blush I was quite smitten with the thought of a mirror-window or of a faux fireplace, but in the end I suspect the best fit for this house will be recreating the original baseboard as best we can and nothing more.  The living room isn't lacking for drama - the remaining three windows and the front door provide plenty of that.  And we're striving for a renovation here, not a remodeling.  So, after a great deal of mental energy, I'm back where I started from.  Still trying to figure out what to do about baseboard.