Showing posts with label someday. Show all posts

Thursday, December 15, 2011

Picky, Picky

I've got a whole list of antique furniture I'd like to bring home to the Einsel House, but I realize it will be years before I could ever find (and afford) all the pieces I want.  The highboy style dressers in our bedroom and Neil's are nice, but I daydream about replacing them with something more Empire style from the mid nineteenth century.   Like the one pictured to the left - it sells on New Year's day at the same auction house where we bought our kitchen island last year.

A couple of blanket chests sell the same day, and I can just see one setting in front of our couch, holding the blankets that for now are just stacked on the floor.


Another piece I can see in the Einsel House is a corner cupboard.  And I've got a few specific requirements for this corner cupboard.  Since it would go next to the open shelves in the dining room, I want the corner cupboard to have solid doors.  The cupboard also will need to be a bit on the small side, as there is only three feet from the corner of the room to the register along the east wall.  In about a year of searching I've only seen a few such cupboards available (and none of those close enough to be convenient).   So imagine my excitement earlier this week when I went on Craigslist and saw this:
image 0

And only about 10 miles from us!  I called the phone number listed and arranged to look at the piece after work yesterday.  Charles could tell how excited I was about the cupboard and told me if it was what I wanted to go ahead and get it. 

So a little after five last night I got home, put away my purse and told Charles I had enjoyed chatting with the cupboard's owner for about half an hour, and that he had grudgingly come down to my price.  And that I didn't buy the corner cupboard.   Of course, Charles' first words were, "Why not?".  The answer is that I'm picky.  Walking up to the cupboard I had immediately sensed something was not quite right.  It was made of pine.  And when I opened the upper door and saw the narrow beadboard interior I realized the problem.  A closer look at the hardware confirmed it - the cupboard dates from around 1920, give or take a few years.  It was the right size, the right shape, the right color, just not the right age. 

The cupboard's owner might have just been trying to make me feel better, but when I finally (and apologetically) told him I couldn't take the cupboard he said, "I understand.  I'd think twice myself before putting that cupboard in an 1840's house."   I'm well aware that I'll probably never find a true mid nineteenth century walnut or cherry corner cupboard for the price I was offered yesterday.  But I woke up this morning with no regrets at yesterday's decision.  I suspect this means I'm an antique snob.  If so I can't deny it. 

(And sorry I've been scarce around here.  I've been having fun with some writing of a slightly different sort lately.)
 

Friday, October 7, 2011

More Salvage

I'm anxious to return to our shed this weekend, but before I do I wanted to put up one more post about salvaging from the old Second Empire brick house.  I've made a total of six trips to the house, which sounds quite impressive until I admit that four of those trips were made in our 10 year old Ford Ranger and it doesn't take a whole lot to weigh the back of that little truck down.  Still, I have a decent pile of material from the old house that will live on here at the EH.

Gathering salvaged bricks from the house isn't quite as simple as it may seem.  The walls of the old house were three courses of brick deep, but only the exterior layer of bricks were fired.  The two inner courses were made of (cheaper) unfired bricks.  These look almost identical to the exterior layer but they are porous.  I remember nearly twenty years ago when my mom laid her first brick walkway only to have half of the bricks disintegrate after a couple winters of the freeze-thaw cycle.  I would rather not repeat that experience with my own brick path.

As the picture at left shows, it was easiest to gather exterior bricks by taking apart the few sections of wall that were still intact.  And although it's difficult to tell in the pictures, I could also identify exterior bricks by the color of mortar on them.  This appeared to be lime based (white) on the exterior course and clay (?) based (tan) on the interior courses.

Back home and neatly stacked, my brick supply for next summer looks like this:


My seven salvaged stone lintels are stacked just beside the bricks:


I'm thinking that when we tackle rebuilding the stone bridge I will try to incorporate these lintels as steps from the bridge down to a path along the creek.

I also brought back three large corbels pulled from the wreckage, and two matching baby corbels I found on my last trip.  These are obviously not the right style to try to incorporate into the Einsel House, but I think they should make some amazing supports for shelves in the shed. 


Finally, one last picture from the old house.  When I climbed up on the pile of rubble I was shocked to find this section of the old mansard roof still partially intact:


There were three different shapes of slate shingles incorporated into this roof - rectangle at the very top, diamond in the center and hexagon at the bottom.  I have such a difficult time understanding how someone could look at this house and not think it was worth saving.

Sunday, September 25, 2011

Bittersweet

Among my future plans for the Einsel House is an herb garden with a brick walk.  The garden won't happen until (at least) next summer, but I've already been stalking Craigslist for several months in case an opportunity for bricks presented itself.  Unfortunately, after at least 4 months of watching no such opportunity appeared.  But then last week my grandma gave me a call.

Remember this house?


Well, I've got a source of bricks now.

My grandma knew I was looking for bricks and when she called to tell me about the huge brick house she saw being torn down on the way to her sister's it didn't take long for me to realize I knew exactly what house she was talking about.  I called the owner last night and was given permission to take whatever I wanted.  ("At least you were kind enough to ask first," the owner's wife said.)  Two trailer loads came back today; mostly bricks but also one stone lintel and two large corbels that were not too damaged by the wrecking ball.  I plan to go back for more bricks as the weather permits.

I sensed back in December that this house would never see renovation, but the salvage trip today was still bittersweet.


Saturday, February 5, 2011

Before the Befores

As promised, this post will be full of older pictures of the house.  We've collected these from several sources - all various previous owners or renters of the EH.  The picture in yesterday's post is the oldest of the bunch.  (I'm still dreaming of finding a picture of the original front porch.)

Continuing with more exterior pictures of the house, here is an aerial photo taken in the mid 1990's:


We'd been told that the house used to be surrounded by trees, but seeing this picture still made me catch my breath.  The only tree in the above photo that was still standing by the time we bought the property is the solitary walnut alongside the drive at the bottom of the picture.  I do wish some of the trees around the house were still here.


Next up is the old bank barn:


I'm told the original barn sat basically where our pole barn now stands.  Although this picture only shows the front of the barn, there was a long "ell" off the back of the barn that extended down nearly to the creek.  Looking out the window as I type this, it's hard to believe the view of the pasture used to be so different.  The old barn was torn down in 1996/97, in preparation for putting the property on the market.  By all accounts the barn was in poor condition when it was torn down.  (It was also, by all accounts, full of large old growth timber.)

Up next, the south side of the house, mid 1990's:


This is one of my favorite old pictures of the house. I've got a list of "someday" projects for the EH, and high on that list is bringing back that little side porch.


At left is a close up of the porch from the picture above. I love the pilaster at the top of the right handrail (which also gives me clues as to recreating the original front porch, another "someday" project). I'm also pleased that this picture shows the interior walls of the porch were covered in clapboard siding. The large pipe that is visible was the vent for the bathroom. If we ever do reopen the side porch we will almost certainly move the bathroom's location at the same time, meaning we could forego this one detail.


The pictures below show the same area, circa 1996 at left, and today at right:


The door and window in the 1996 picture went out to the porch pictured above.  The current door goes to the bathroom.  I wish the 1996 picture was brighter so that I could make out more details on the door. (Looks like we need a larger area rug!)

Our 1996 photographer did a 180 degree turn after taking the above picture to snap these two pictures of the kitchen:


(I hope you'll forgive me, P, if you ever see this blog post, but it was one of the best pictures of the old kitchen.) 

These earlier kitchen pictures intrigue me. What I see in these pictures (especially the horizontal board 2/3 up the wall) seems to reinforce my belief that the kitchen addition dates from the 1880s or earlier.

At right is a current photo taken at the same angle as the right picture above.  The ivory light-switch and plate in the current photo are black in the earlier photo, if that helps you orient the two pictures.  The left picture above shows the wall that used to divide the kitchen wing into two rooms.  (Note the flue cover, and compare it to the location of the chimney in the picture below.) 

The last picture I have to share today shows the back of the house, again circa 1996.  See the little cupola over the kitchen roof?  No one I've talked to can ever remember it having a bell, but it seems obvious to me that it was intended to house a bell.  The cupola blew off during a storm sometime after 1997.  Replacing it is another item on the "someday" list. 


And with that, I'll end this post.  I've got a cake cooling in the kitchen and a seven-year-old boy who is quite anxious to frost it.  : )

Wednesday, January 12, 2011

The Kitchen Project Begins

I'm taking off on a new project.  But unlike earlier Einsel-projects of this scale, I'm going to be taking this project on solo.  When you live in a house like this one there are countless benefits to having a mother whose day job is in a custom woodworking shop.  But there is a downside - I've been perhaps too reliant on my mom's skill and willingness to help.  I'm grateful for the help.  So grateful.  But I'm also tired of feeling intimidated and incompetent when left alone with any power tool that involves a blade or compressed air. 

So as I contemplated the changes I have in mind for our kitchen, I also contemplated tackling this one alone.  Mom's seen my plans for the kitchen, and she knows I'll be relying on her advice (and extensive tool collection) but she also knows I want to do this myself. 

I'm starting on the north end of the kitchen.  The only change in this half of the room will be the addition of beadboard wainscoating under the existing chair rail.  Here's a picture of my progress so far:


In a way I feel like my age was just divided by ten and I'm a three year old insisting, "I can do it by myself!".  And, like a three year old, my progress is much slower and my work perhaps a bit rougher around the edges.  But I did it myself, gosh darn it!

My plan is to do the room in sections, which means I will prime and paint the beadboard pictured above before moving on.  We're living in the house, and I'm hoping to keep most of the kitchen in some semblance of order as I proceed.  Up next will be the northeast corner of the room, which will be a repeat of the beadboard work I'm doing in the northwest corner of the room.

The south half of the room will be more challenging.  Here's a picture of what I'll be starting with:


(Any guesses where Tiny the Cat's food and water dishes are?)  The plan here is to add crown moulding and new hardware to the upper cabinets.  They will be painted the same off-white color as the beadboard and trim in the other end of the room.  If the budget allows, there will also be new counters and a new sink before giving the lower cabinets the same treatment. 

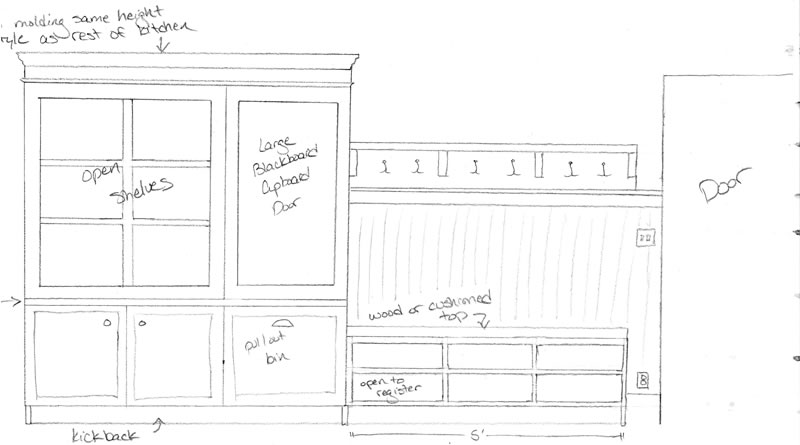
The wall along the right side of the above photo of the Einsel House kitchen is going to present the biggest challenge.  Part of this wall will be a mudroom style row of hooks with a small shelf above and a bench below.  I'll be using the picture at right as a guide, except I'm planning on open cubbies for shoe storage on the bottom rather than a closed bench.

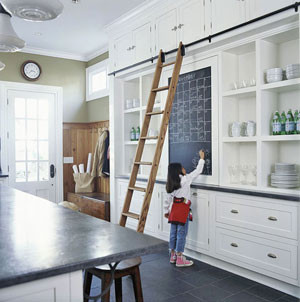
Initially this bench and hooks combo was my only plan for our southwest kitchen wall.  But while browsing at Houzz I found this picture:

Kitchen Storage Wall traditional kitchen

And I instantly knew what I wanted to do.  Merging my original bench and hooks plan with the left half of the entourage pictured above I sat down and sketched out this:


Yeah, kind of crazy I know.  Especially when I admitted just a few paragraphs back that using a brad nailer or a circular saw makes me nervous.  But I'm still planning to do it. 

Saturday, January 8, 2011

"Plans are only good intentions...

...unless they immediately degenerate into hard work."  ~Peter F. Drucker

2010 was quite a year here at the Einsel House. Here's a selection of scenes around the house from the beginning of 2010:


By December things looked a bit different:


And if we can accomplish half of the projects I have planned for 2011 then things should look different still by next December.

So, what’s in store for 2011 you ask?

The Shed
This poor little building is long overdue for a little love. The picture at left was taken in October of 2009, but it basically looks the same now.  Our plans for this spring/summer are to tear off and replace the rotten awning, recoat the metal roof, wrap the entire building in tar paper and then cover it with salvaged barn siding.

The Stone Bridge
This is perhaps the most intimidating project on the horizon, but given the rate the bridge is eroding I know we should not put this off. The plan is to rebuild the bridge in 4 sections, starting with the northern half of the west side. I suspect this may be a four year project.

The Springhouse
Although the springhouse was the focus of much attention in 2010, the work on this little building is not yet finished. I want to replace the windows and finish work on the roof, as well as plant some ivy or other ground cover around the new stone walls in front of the springhouse.

More Masonry Work
We’re saving our pennies so that we can have our masonry contractor return this spring to repoint the east side (back) of the house. The previous owner of the EH repointed the north side of the house, and our mason did the west side in the fall of 2009 and the south side in June, 2010. Once the east wall is repointed this spring/summer we will save up and hopefully be able to have the chimneys rebuilt sometime in 2012.

The Kitchen
I'm quite excited about my plans for this room and predict I’ll dive into this project sometime before January ends. More details should be coming in a post soon.
The Yard
The yard here is currently a blank if somewhat bumpy slate. My (perhaps overly ambitious) plans for this summer include clearing a small area along the creek for a stone bench that Charles’ parents gave to us last year and planting a vegetable/herb garden in front of the kitchen wing and surrounding it with a picket fence. And of course more general leveling and stump clearing.

So here’s to twenty-eleven. Do I think all of the projects outlined above will be completed a year from now? Probably not. But we’ll have fun trying!

Monday, December 20, 2010

You're Gonna Wind Up Where You Started From

I’ve been pondering the east wall in our living room. This is the wall where we took out a closet added by the previous owners. (See the second half of this post from Nov. 2009.)  This is also the wall that originally had a window facing out on the former side porch. That window was closed in by the previous owners when they enclosed the porch to expand the bathroom. But we still have most (all?) of the walnut trim from the original window.  If you go back and read that post from Nov. 2009  notice that at the end I wrote we were "still trying to figure out what to do about baseboard".

Well, this is what the wall currently looks like:


Um, yeah, we're still trying to figure out what to do about baseboard.  Putting baseboard up sounds easy enough, but in reality it’s posing something of a problem. The pictures below are recycled from a post last April.  They show a before and an almost after of some baseboard on the south wall of the living room:


Notice that the paneled area under the window takes the place of the baseboard. Although we saved all of the baseboard we removed from the east wall, because that wall originally had a window (with a full paneled bottom) there is not enough of the original baseboard to now cover the entire length of the wall. Thus the problem.

Despite having access to two woodworking shops, it appears that successfully recreating the profile of the molding at the top of the current baseboard is going to be something of a challenge. And there’s also the problem of what wood to use for the new baseboard. I’m semi-confident that we can match the color of the EH’s existing wood but matching the old lumber's grain is a bit more difficult.

If we put back up the original baseboard I’m worried we will wind up with a piecemeal effect – two short sections of the original walnut and a third newer section (that, for the reasons explained above, I fear would stick out like curly fretwork in a Frank Lloyd Wright house). The other option is to recreate the entire length of baseboard in one piece of new wood – but we would still have to find a way to match the existing baseboard's color, grain and profile before I would be willing to do this.

Now, even though actual work on the house has basically been at a standstill for the last few months, the planning and plotting in my head never stops. And so, after six months of living with a baseboardless wall, I’ve come up with two other options for dealing with this dilemma.

The first possibility occurred to me a couple of months ago when I noticed the picture at right while flipping through This Old House magazine.

Hmmmm…Our wall had a window in it originally. And like I mentioned before, we still have most (all?) of the original trim from that window. What if we put back up the original window trim, bottom panel and all, and simply replace the actual ‘window’ part with a mirror? If we did, then the remaining original pieces of baseboard should be enough to complete the wall. Hmmmmm…….

After pondering this idea for a few months I’m still not sure if I like it or not. I do like the fact that it would put more of the beautiful original walnut back into the room. And it would create a focal point. But I worry that as a focal point it would draw attention to a feature that has obviously been altered from its original appearance. After all, even if we put the trim back up we can not recreate the depth of the original window. And would a single, solid mirror look misplaced next to three other 12-paned windows?

Then while browsing the houseblogs site I noticed this "Faux Fireplace" entry at Petworth Row House. And I thought, "Hmmmmm…..". Using the existing trim pieces from the former window, I suspect that we could make a mantel that would blend perfectly with the rest of the room. Couple that with an electric fireplace insert and we could really dress up that east wall. And with a fireplace eating up a good chunk of the wall space, the original remaining baseboard would be enough to finish the job. I’ve always felt that a fireplace is the one feature that seems to be ‘missing’ from the Einsel House. (And based on how often visitors ask, "So where is the fireplace?" it’s obvious that I’m not alone in my feelings on this matter.)

But, but, but…an electric fireplace insert?!?! Am I in my right mind? In the kitchen I wouldn’t think twice, that room has already been altered way beyond its original condition. But the living room still exudes vintage 1840’s charm. We might be able to create a mantel that would not spoil that authentic feel, but what about the rest of the fireplace? 

I admit, at first blush I was quite smitten with the thought of a mirror-window or of a faux fireplace, but in the end I suspect the best fit for this house will be recreating the original baseboard as best we can and nothing more.  The living room isn't lacking for drama - the remaining three windows and the front door provide plenty of that.  And we're striving for a renovation here, not a remodeling.  So, after a great deal of mental energy, I'm back where I started from.  Still trying to figure out what to do about baseboard. 

Thursday, December 9, 2010

Holiday Home Tour

My mom's birthday is this coming weekend, but we treated her a week early by buying her a ticket to the Holiday Homes Tour sponsored by the local preservation society.  So last Sunday afternoon she, Cecilia and I spent several hours driving through the countryside to tour various houses.  I was most eager to see the two 1830s Greek Revival homes included in the tour.

I had my camera along, but did not take any pictures of the homes' interiors.  There were two reasons for this - first, I didn't want to take advantage of the homeowners' generosity; and second, every house was packed with people.  Any interior picture I took would have revealed more about current trends in winter appearal than it would have about the architecture of the homes in which the pictures were taken. 

But I did take a few exterior pictures.  : )

The picture below is a bit bittersweet for me.


That is very similar to the side porch that our house used to/should have.  Granted, our side porch was smaller and a bit less ornate.  Our porch had only one window with the door (although my picture cuts it off, the house porch pictured above had two windows with a centered door) and our porch had only two pillars (compared to four), but still the idea and the feel is exactly what I hope we can someday bring back to our house.

This is what we've got now:


But in my mind... 

I'll start by taking out the paneled wall with the window.  Put two simple square pillars flush against the stone walls to the left and the right.  Give the pillars some simple molding on the very top and bottom.  I might even add some decorative wood trim like pictured above, but it's nothing too intricate or ornate, this isn't the Victorian era yet.  The porch is, say, five or so feet deep.  Its back wall consists of a door (into the dining room) to the left and a window to the right.  Now - I'll put a divided pane window back into that shuttered hole in the small stone wall.  Add appropriately-sized louvered wood shutters.  (Yes - they have to be wood shutters.)  With shutter dogs.  (I love shutter dogs!)  Now, I'll settle into a rocking chair on my lovely porch.  There's a terra cotta pot on the top step in front of me with some red flowers in it - geraniums, maybe, or begonias.  My handsome husband steps out from the dining room, joining me with a glass of cool lemonade to sip while we enjoy the view.  (It's almost always mid-June in my imagination.)  The kids are laughing while playing on their swingset to our right while to our left a barn cat or two - or five - lounge on the stone walls in front of the springhouse.  Our whole view is framed by the tree lined creek, which can very faintly be heard gurgling in the background....

It's going to happen someday.  Might take 30 years, I'll admit.  But it'll happen.  Even if it's my grandkids playing on the swingset.

(Which reminds me of one of the guests at our open house last October.  While looking at some pictures of the house taken just after we bought it she looked up at me and said, "Wow.  You must have had some, uh, imagination when you bought this place."  If she only knew!)

But - back to the present.  And the home tour.  The second 1830's home on the tour was my favorite.  I've driven by it (perhaps a bit too slowly I admit) multiple times to admire it.  After seeing the interior and hearing the home's history my admiration is even greater.  Vandals started a fire in the house in the mid 1950's and it sat vacant and boarded up for over 30 years.  The current owners began their renovation in 1989 and have done a remarkable job. 


They reconstructed that front porch from original pieces fished out of a gulley alongside the house. 
Here's a side profile of the house:


One of my favorite features is this picket fence along the west side of the (new) garage:


I want to do something similar in front of our kitchen - a picket fence surrounding the area in front of our home's frame wing, with the sidewalk down the middle dividing the area into a small herb garden to the right and a small vegetable garden to the left.  (And I hope to turn this daydream into reality well before 2040.)

But as cute as the picket fence and little front porch on the yellow Greek Revival are, neither is the home's focal point.  The house's most stunning feature can not be seen when driving by.  You've got to get behind the front door to see this:


I really didn't take any interior pictures during the tour - this one came from the local newspaper.  But that staircase was just too stunning not to share. 

All in all it was a lovely afternoon, and I'm grateful to the homeowners who were willing to open their homes for the tour.  It's such a joy to see old homes celebrated as old homes and not remodeled to within an inch of their lives.  Perhaps someday, quite a while from now, we'll have the Einsel House polished up enough (and stuffed with enough antique furniture) that we can return the favor open our own front door for a holiday homes tour.