Showing posts with label before. Show all posts

Saturday, July 19, 2014

Kitchen Update

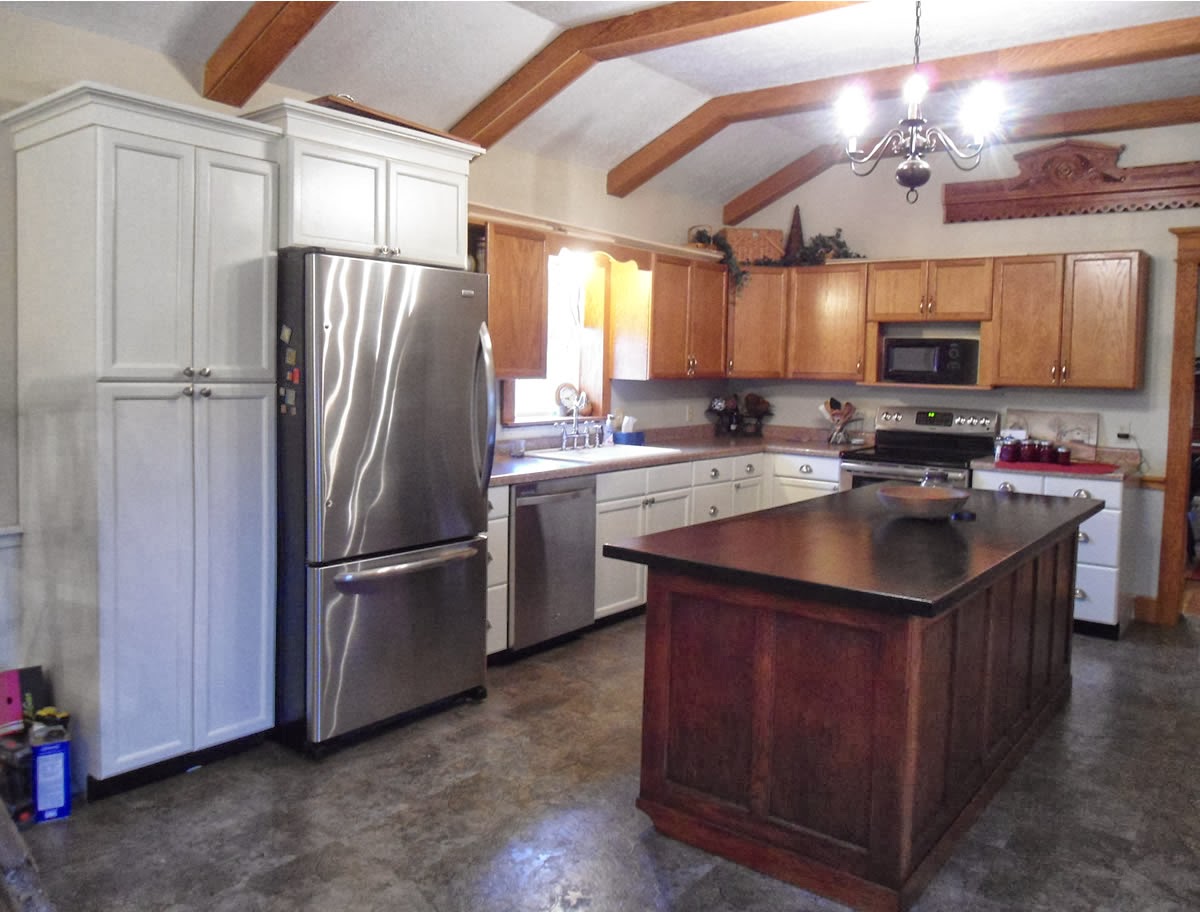
I took advantage of a tidy kitchen today to snap some photos so I could update anyone who happens to stumble by my poor neglected blog.  As a (weak) excuse for the lack of posts here, I admit that a full year passed between the first builders grade oak cupboard door coming down and the last white-painted cupboard door being rehung.

So, for a quick review, here's the kitchen in 2009:


In 2011:


In 2013:


And today:


I'm rather proud of the fact that I did about 95% of this work by myself.  Painting helped hide a few imperfections, but all in all I'm quite happy with how everything turned out.  I did have help from my mom who cut all the arched brackets in her shop.  The little arch along the side of the refrigerator was her idea, and it's one of my favorite little details.  

I also had help from my uncle J, who moved an outlet and handled the electrical end of installing the new hood range.  As the earlier pictures show, the microwave used to set on a low shelf just above the stove.  The shelf was so low that it made using the stovetop awkward and dark.  It also seemed to be perpetually covered in grease and every other kind of cooking gunk.  The new hood is a basic model, but I love having the extra light and height when cooking. 


I also love the sink area.  I splurged on a new bridge style faucet and a mini-chandelier that matches the larger chandeliers in the kitchen and dining room.  Mom's brackets show up here at both the top and bottom of the upper cabinets, and I also like the new beadboard backsplash.  The laminate counters were a budget concession, but I'm still much happier with the mottled tan of the new counters than the garish green of the old. 

Like everything else around here, there are still a few details I'd like to tweak (like painting the dark toe-kick areas and adding little arches in front of the toe-kick to give more of a furniture look to the lower cabinets) but for now I'm calling the kitchen good. 


Monday, September 30, 2013

The Current Project

The biggest project undertaken here during my blog absence (other than having a baby) has been the kitchen.  Here's what the kitchen looked like when we bought the house almost 4 years ago:


By 2011 we had progessed to this:


That's pretty much how the kitchen stayed until this year.  In January we replaced the sink, faucet and counters.  We also added a dishwasher (a much appreciated Christmas gift from Charles' parents).  In June I began painting and replacing hardware on the cabinets.  Starting with the lower cabinets and going section-by-section, I've made it to this:


It's been slow progress - but it's still progress.  : )  

Monday, May 28, 2012

Be Still My Heart


Two cousins continued a tradition this Memorial Day.  One journeyed up from the south and the other down from the north.  They met each other in the middle, to visit together the graves of their ancestors.  But they added an extra stop this year, visiting the stone house that was in their family from 1901-1997.  

The cousins are on their respective ways back home right now. But they were kind enough to leave behind a memento of their family's years here.


That's the Einsel House, circa 1906.  The children are siblings, Carl and Norma Frankenfield.  The woman is probably their mother, Emma Frankenfield.

 For now this picture only graces the blog, but it's going to be framed and hanging on the dining room's west wall just as soon as I can get it enlarged and find an appropriate frame.


Sunday, May 13, 2012

For You, Mom

You've been asking for another post here for a few weeks now and since you're on the opposite side of the country right now and any other gift will have to wait until you're home, here's an Einsel House post for you today.  Happy Mother's Day! : )

The basement windows at this house have been an issue as long as we have owned the place.  Previous owners raised the level of the yard in front of the house by about a foot, basically covering the basement windows on the west and north sides of the house.  When we bought the house the west facing basement windows (front of the house) had been removed and the holes filled with concrete.  The concrete is immediately obvious from inside the basement, but when outside the only evidence of the former windows still visible are the original window lintels, which are now right at the soil line.

The west facing basement window had not been removed, but it was in a sorry state when we bought the house.  Poor drainage coupled with a poorly sloped yard meant that whenever it rained water funneled to this window, pouring through into the basement below.  By the time we bought the house the sill for the window was completely gone and the two sides of the window frame were half rotted away.   The window itself was still in place, but we removed it in 2009 to stop it from further deterioration.  Then, because we had other more pressing issues during those late days of 2009, we temporarily "fixed" the resulting opening in the side of the house with a piece of foam board secured in place with liberal amounts of expanding foam.  (Classy, I know.) Outside, we covered the atrocity with a straw bale.

And so remained until this spring.  On one of our nice March days I pulled back the straw bale and dug out the long abused window.  Charles helped to break loose the foam board, and then we stood back and looked at the result:


Not very inspiring results for an afternoon of hard and dirty work.  But it was at least a starting point. 

(On a side note - I was surprised to uncover the poured concrete window well that is visible in the pictures.  It gives a good idea of the original level of the yard prior to it being raised by previous owners.) 

The nice weather in March gave way to a cold and wet April, so the straw bale (partnered with some plywood this time) went back over the gap in the house.  Meanwhile, I cleaned up the original three light window.  What had been the bottom exterior side was partially rotted, so I removed what was too far gone and treated what remained with a rotted wood stabilizer.  I also decided that when reinstalled I would rotate the window, so that the former exterior bottom (most exposure to water/weather) would become the interior top (least exposure to water/weather).  With the window primed and under one coat of paint I got to try my hand at glazing - and found I rather enjoyed it.  Luckily we had enough correctly sized panes of old glass to put two panes in each of the window's lights.  Another coat of paint, and the window was ready to go.  The frame was another story.

After taking the pictures above, I pried out what remained of the two sides of the frame.  They were too far rotted to try to save.  Each piece was a true 2" thick and 11" wide.  I called the local specialty lumber shop, but the owner said he could manage either 2" thick OR 11" wide, but in order to do both he would need to glue pieces together.  That didn't sound like a good idea for wood that was going to be used in a basement window frame below grade.  At my mom's suggestion (Hi, Mom!) she and I went back up to the old Second Empire house we salvaged bricks from last year.  This time we salvaged wood.  While we didn't find any 2x11 boards, we did bring home a 2 x 9 1/2 that we thought we could make work.

With mom's help, we cut pieces for the new window frame.  Under the gray weathered surface of that old wood was beautiful quarter sawn oak.  I commented to mom that you'd never find 2 inch thick quarter sawn oak used to frame a house today.

Back at the Einsel House, I decided to dry fit the pieces we had cut for the new frame before painting them.  That turned out to be a good idea.  At some point during that long afternoon I decided that it was definitely easier for the Einsel House's builders to build the stone walls around the already constructed window frame than it was for me to try to fit a new frame into the already constructed stone walls. When I finally got everything to fit together nicely, I pulled everything back out.  Since this wood will all be below grade I wanted to prime and paint all sides of each piece before installing them for good.

The remaining steps took almost another two weeks, but I can type them out much more quickly:

-seal, prime and paint (2 coats) the new sill and frame
-assemble frame in wall
-fill remaining gaps in top board with epoxy filler, sand, prime and paint (2 coats)
-install repaired window
-tuck point gap between the stone walls and new frame (I called our mason who gave me the correct mortar recipe for this step)
- build a stone retaining wall to bring the window well up to the current level of the yard

And, as of late yesterday afternoon, here is the "new" window:


I'm very pleased with this.  
So pleased I may even take my lunch outside today and eat it while admiring my work.  : )   


Sunday, November 20, 2011

In the Details

There's an old barn just south of here on the county line that rests quietly in a grove of trees.  


I've been known at times to take a slightly longer route than necessary just so I could enjoy the scene pictured above.  Still, I had been driving by this barn for several years before I noticed a little detail near the gable peak.


See it?

This whole summer as I was working on our little Einsel shed I've had the old barn in mind.  So earlier this summer, with camera in tow, I stopped at the old barn. Although I knew there were three stars in the old barn's gable, it was only from inside the barn that I realized the peak was a five point star while the two lower were six point stars.


And so, the south facing gable peak of the Einsel shed:


I am so thrilled with how this turned out.  There's no corresponding interior picture from the shed, though.  Behind my stars are boards painted black with several holes drilled through to provide ventilation.  Secured to the front of the black-painted boards is a layer of screen to hopefully prevent wasps from nesting inside the shed. 

I've really enjoyed my work on this side of the shed, bringing to reality the details I've seen in my mind for so long.


Obviously, I'm not quite finished yet.  The upper right corner will continue out to incorporate the new awning, and I've got two doors to build and install.  With Thanksgiving and December around the corner I figure my outside work is basically done for the year, but I'm hoping my mom won't mind if I use her (heated) shop - and perhaps advice - while building the doors.  The door hardware I ordered is on backorder right now, so I've got a little time anyway.  (Oh, and since I'm guessing some may be curious, the thick wire hanging off of the roof is from the lightning rod.  I'm thinking eventually it will be rerouted to hang over the back of the shed instead of the front.)

I'll have two sides of the shed to finish next summer, but I'm quite pleased with what I've accomplished so far. 


Not too bad considering what the poor little building looked like last May:


: )

Wednesday, September 21, 2011

My Favorite Color

It must be red.  Because I'm usually happy when I'm painting, but I'm only ridiculously happy when I'm painting something red.

 So I've quite enjoyed my last couple weekends of work on the west side of the shed:


Getting the salvaged barn siding hung has been more time consuming than I expected but I'm thrilled with how it is looking.  (And honestly, by now I should realize that every job is more time consuming than expected.)  


First, each piece of siding was primed and cut to length.  I then caulked the existing nail holes and the most severe cracks.  The first coat of red paint went on before the boards were hung, and the second coat once the wall was finished.  It's ship-lap siding, and I don't want unpainted sections of wood to appear as the siding contracts or swells.  The wood has a lovely aged look to it, but it's definitely still got a lot of life left in it.  Every third board had to be notched at the top to fit around roof joists and this salvaged siding cuts much harder than any of the new lumber I used rebuilding the shed's awning.

There are three ugly sides of the shed still to go, but the view coming up the driveway is already 100 times better.  Because instead of this:


It's now this:


This weekend looks like it may be a washout, but as soon as I'm able I plan to start work on the shed's south side next.

Friday, September 16, 2011

Creative Financing

We’re approaching the two year anniversary of a very nerve-wracking period here. The earliest posts on this blog recount the whole story in detail, but I’ll give the cliff notes version here. Basically, to say we bought the  Einsel House in an unconventional manner is an understatement.


Thursday, August 27, 2009 – Charles and I are the only bidders for the Einsel House when it is sold at sheriff sale. Immediately after the sale we find out there was an attorney who was supposed to bid for the bank, but he basically wasn’t paying attention and never placed any bid.

August 27-September 19, 2009 – Charles and I wait anxiously for closing (which we are told takes 6-8 weeks)

September 20, 2009 – Our attorney gets a phone call from the office of the attorney who didn’t bid at the sale. That attorney offers us $ to rescind our bid. If we refuse he threatens to contest the sale.

A few days later I wrote here, “So in the end we are not that concerned about losing the Einsel House. The main difficulties have to do with time and money. And lack of sleep. I'll elaborate on the "time and money" stuff later…”. Well, it’s two years later, and we obviously did get the house, and it feels now like a good time to finally share some of the details I withheld back then.

Anyone who has read here regularly already knows that we owe my parents (particularly my mom) a huge thank you for all of the help they have provided at the EH, especially during those first nine months. But what regular readers here don’t realize is that we are indebted to my parents for more than just their time and labor. We also owe them innumerable thanks for their trust in Charles and me. That is because much of the money spent on the Einsel House during those first nine months was money borrowed in my parents’ names and borrowed against their house.

Charles and I have always been conservative financially. When we started looking at houses we went to the bank regarding preapproval for a loan. We told the loan officer how much we planned to borrow, he took our information, pulled our credit scores and immediately said, “That will be no problem!”. The bank loved Charles and I, but it turns out we were only half of the equation; the other half was the Einsel House. And the bank wasn’t nearly as enthusiastic about the EH. It made no difference how high our credit scores were; with a patchwork roof, peeling paint, crumbling drywall and no furnace there was no way the Einsel House would qualify for a conventional loan.

Our loan officer said we would probably qualify for a construction loan (portfolio loan I think he called it), but the extra hoops such a loan would require made Charles and me very cautious. As I understood it, with a construction loan the bank would have to review and approve everything we did to the house. We would have to provide the bank with documentation that all work was done by licensed, insured professionals and we would have to have quotes approved by the bank before any work could begin. Trying to renovate the house with a bank looking over our shoulder through the entire process did not sound fun at all.

Enter my parents - who had a house that would easily qualify for a conventional loan. When we brought the possibility up with our loan officer I think he was somewhat taken aback, but he said that from the bank’s perspective it would be no problem. If my parents’ house and personal credit both qualified, the bank really didn’t care how the money was spent. So my parents applied for a home equity line of credit in their names, and with their house on the line. The plan was to use the HELOC to make the repairs needed in order for the Einsel House to qualify for a conventional loan. Charles and I would be responsible for all fees and payments required on the HELOC, and once the Einsel House was up to par we would refinance it in our own names, using the proceeds to pay off the HELOC in my parents’ names.

The paperwork for the HELOC against my parents’ house went through without any complications, and on September 17, 2009 they signed their names opening the line of credit. We were all set for our closing on the Einsel House – until three days later when we suddenly had an attorney threatening to contest the sale.

This added a whole new set of complications to the situation. The line of credit through my parents was set up and ready to go, and from that front we were still able to close and start repairs. But the attorneys I work for cautioned us strongly against putting any money into the house with the possibility of litigation hanging over us. Although they felt that we stood a very good chance of keeping the house in a court battle, they said that if the sale was somehow reversed we would probably lose any funds invested in the building above the purchase price. The courts would say that any improvements we made to the house while it was the subject of ongoing litigation were a “known risk” and if we lost the house we would also lose any money spent on improvements. Legally, the safest thing would be to close on the house, but then not put any more money into it until we were sure we were not headed to court. But it was already late September, and the house in question had no furnace and needed obvious structural repairs. There was no way we wanted to let it sit empty through the approaching winter.

The loan officer at our bank had more bad news. The home equity line of credit through my parents was still there, and the bank still didn’t care how that money was spent. But our loan officer warned us that the bank would never approve a refinance on a property that was the subject of ongoing litigation. This meant that even if we took our chances and made the necessary repairs to the Einsel House we would not be able to refinance it until any possible litigation was resolved. This was concerning for two reasons. First, the HELOC had an adjustable interest rate and we wanted to be able to refinance as soon as possible to secure a fixed rate. Second, Charles and I were planning on a conventional 30 year loan when we refinanced; but the HELOC was based on a 10 year amortization. This meant that our monthly payments on the HELOC were more than double what they would be following a refinance. We were prepared to make those payments for awhile, but being tied to those payments indefinitely was very concerning – especially because it was technically my parents who were on the line.

The attorneys I work for were quite confident that if push came to shove case law would ultimately uphold our purchase of the Einsel House. But they warned that even if we ultimately prevailed in court, it could take a long time to get there. The attorney opposing the sale was the senior partner in a multiple member firm. Even if he knew he would lose, it would cost him nothing but time if he chose to be a thorn in our side (and we had no reason to doubt that he would).

In the end we bought the other attorney’s cooperation by paying him an amount equal to half of his malpractice insurance deductible in exchange for his signature on a "Covenant Not to Intervene or Interfere in Sale." Considering the alternatives it was a concession we felt we had to make. And in the end it did all work out. We closed without complications on the Einsel House on October 7, 2009. For eight months we made payments on the line of credit open in my parents’ names, and in June, 2010 we closed on the refinance of the Einsel House, paying off the HELOC and settling into a conventional fixed rate 30 year mortgage.

It’s a little bit surreal to recall the emotional highs and lows surrounding our purchase of the Einsel House.  If I were making the whole story up I don't think I could have put more twists and turns along the way.  Looking back, I remember the last advice my dad shared with me on the morning of the sheriff sale -  "Just relax," he said, "if it's meant to be it will be".  And in the end, I'm so glad that he was right.

Sunday, June 5, 2011

More Work on the Shed

Typical of Ohio, the weather here has skipped straight from cold and water-logged to hot and oppressively humid.  It's made outdoor work the last few weekends quite exhausting, but we've continued to pluck away at the shed regardless. The pictures below go through two weekends of work on the east side of the shed.  

I'll start with a couple of pictures just after we bought the property in October of 2009:


And the progress made over the last 8 days:


All work was supervised by a very concerned crowd of Einsel Shed bees:

I've managed not to get stung yet, although I'm sure by posting that fact I'm condemning myself to at least two bee stings the next time I venture by the shed.

The last section of the old roof is proving the most difficult to remove.  It's j..u..s..t out of comfortable reach from any ladder, and although I attempted to climb onto the barn roof proper the pitch was steep enough that I crawled back down immediately.  Heights are not one of my strong points.  

This last section of roof is also complicated by the fact that it's not as rotted out as the lower portion of the roof.  The nails and staples still have some bite in the plywood up here.  And there is a heavy rubber mat (that gets very very hot from the sun) nailed over this part of the roof.  Underneath that is a layer of black asphalt shingles with their own set of nails.  And underneath that is a layer of tar paper (also nailed on).  Under the tar paper is finally plywood, held in place along each joist by alternating nails and staples each about an inch apart.
You can kind of see the three layers of roofing materials in this picture:


I doubt there will be any further work on the shed today.  We've got church and a family get together in the afternoon.  (And I want more time to plot a good way to get at that last foot and a half of roof still to remove.)

Saturday, May 21, 2011

The Shed

I've not talked much about the shed here.  Frankly, that's because it's ugly.


But hopefully by the end of this summer this little black sheep of our buildings will be more presentable.  The past two weekends I've been busy cleaning out the weeds, cinder blocks, and other assorted odds and ends that have been surrounding the building.

Here's the west side last Saturday morning (I'd already pulled out some pieces of metal fencing and yanked out the largest dried out remains of last summer's massive weeds):


And by 3pm today:


I don't have a great before picture of the north side of the shed.  When we bought the property this side was an assortment of small animals pens in various states of disrepair and all overtaken by weeds that were taller than I am.  5'1" might not be that tall for a 31 year old woman, but it's pretty impressive for a weed.  We had help back in late 2009 from some of my cousins, and Charles worked last fall to finish dismantling the pens on this side of the shed.  Today I cleared out all the remaining stones, broken glass and rubble, then weeded and smoothed the area before spreading grass seed.

The two pictures below will give some idea of the progress here (and of the work still to come!).  The pictures actually are of the east side of the building, so try to ignore the growing holes in the awning roof and focus on the changes in the right half of the pictures.

October, 2009:


May, 2011:


Guess which side we're working on tomorrow if the weather holds?  : )

Saturday, February 5, 2011

Before the Befores

As promised, this post will be full of older pictures of the house.  We've collected these from several sources - all various previous owners or renters of the EH.  The picture in yesterday's post is the oldest of the bunch.  (I'm still dreaming of finding a picture of the original front porch.)

Continuing with more exterior pictures of the house, here is an aerial photo taken in the mid 1990's:


We'd been told that the house used to be surrounded by trees, but seeing this picture still made me catch my breath.  The only tree in the above photo that was still standing by the time we bought the property is the solitary walnut alongside the drive at the bottom of the picture.  I do wish some of the trees around the house were still here.


Next up is the old bank barn:


I'm told the original barn sat basically where our pole barn now stands.  Although this picture only shows the front of the barn, there was a long "ell" off the back of the barn that extended down nearly to the creek.  Looking out the window as I type this, it's hard to believe the view of the pasture used to be so different.  The old barn was torn down in 1996/97, in preparation for putting the property on the market.  By all accounts the barn was in poor condition when it was torn down.  (It was also, by all accounts, full of large old growth timber.)

Up next, the south side of the house, mid 1990's:


This is one of my favorite old pictures of the house. I've got a list of "someday" projects for the EH, and high on that list is bringing back that little side porch.


At left is a close up of the porch from the picture above. I love the pilaster at the top of the right handrail (which also gives me clues as to recreating the original front porch, another "someday" project). I'm also pleased that this picture shows the interior walls of the porch were covered in clapboard siding. The large pipe that is visible was the vent for the bathroom. If we ever do reopen the side porch we will almost certainly move the bathroom's location at the same time, meaning we could forego this one detail.


The pictures below show the same area, circa 1996 at left, and today at right:


The door and window in the 1996 picture went out to the porch pictured above.  The current door goes to the bathroom.  I wish the 1996 picture was brighter so that I could make out more details on the door. (Looks like we need a larger area rug!)

Our 1996 photographer did a 180 degree turn after taking the above picture to snap these two pictures of the kitchen:


(I hope you'll forgive me, P, if you ever see this blog post, but it was one of the best pictures of the old kitchen.) 

These earlier kitchen pictures intrigue me. What I see in these pictures (especially the horizontal board 2/3 up the wall) seems to reinforce my belief that the kitchen addition dates from the 1880s or earlier.

At right is a current photo taken at the same angle as the right picture above.  The ivory light-switch and plate in the current photo are black in the earlier photo, if that helps you orient the two pictures.  The left picture above shows the wall that used to divide the kitchen wing into two rooms.  (Note the flue cover, and compare it to the location of the chimney in the picture below.) 

The last picture I have to share today shows the back of the house, again circa 1996.  See the little cupola over the kitchen roof?  No one I've talked to can ever remember it having a bell, but it seems obvious to me that it was intended to house a bell.  The cupola blew off during a storm sometime after 1997.  Replacing it is another item on the "someday" list. 


And with that, I'll end this post.  I've got a cake cooling in the kitchen and a seven-year-old boy who is quite anxious to frost it.  : )

Friday, February 4, 2011

Recognize this place?


This is the same view of the house as the pictures in the blog header.  Taken circa late 1970s I'm guessing.  Look at those trees.  I'm not sure who the guy working on the porch is.  Nor am I sure why all that wood is piled up by the old side porch.

More 'old' pictures coming soon....

Saturday, January 8, 2011

"Plans are only good intentions...

...unless they immediately degenerate into hard work."  ~Peter F. Drucker

2010 was quite a year here at the Einsel House. Here's a selection of scenes around the house from the beginning of 2010:


By December things looked a bit different:


And if we can accomplish half of the projects I have planned for 2011 then things should look different still by next December.

So, what’s in store for 2011 you ask?

The Shed
This poor little building is long overdue for a little love. The picture at left was taken in October of 2009, but it basically looks the same now.  Our plans for this spring/summer are to tear off and replace the rotten awning, recoat the metal roof, wrap the entire building in tar paper and then cover it with salvaged barn siding.

The Stone Bridge
This is perhaps the most intimidating project on the horizon, but given the rate the bridge is eroding I know we should not put this off. The plan is to rebuild the bridge in 4 sections, starting with the northern half of the west side. I suspect this may be a four year project.

The Springhouse
Although the springhouse was the focus of much attention in 2010, the work on this little building is not yet finished. I want to replace the windows and finish work on the roof, as well as plant some ivy or other ground cover around the new stone walls in front of the springhouse.

More Masonry Work
We’re saving our pennies so that we can have our masonry contractor return this spring to repoint the east side (back) of the house. The previous owner of the EH repointed the north side of the house, and our mason did the west side in the fall of 2009 and the south side in June, 2010. Once the east wall is repointed this spring/summer we will save up and hopefully be able to have the chimneys rebuilt sometime in 2012.

The Kitchen
I'm quite excited about my plans for this room and predict I’ll dive into this project sometime before January ends. More details should be coming in a post soon.
The Yard
The yard here is currently a blank if somewhat bumpy slate. My (perhaps overly ambitious) plans for this summer include clearing a small area along the creek for a stone bench that Charles’ parents gave to us last year and planting a vegetable/herb garden in front of the kitchen wing and surrounding it with a picket fence. And of course more general leveling and stump clearing.

So here’s to twenty-eleven. Do I think all of the projects outlined above will be completed a year from now? Probably not. But we’ll have fun trying!